Blog

  • twl.py

    Warning

    This project is some 2-3 years old (though has been updated to the latest APIs) and is very incomplete since I never had time/motivation to really finish it. There’s a lot of legacy code that should be rewritten and ripped out because I didn’t know what I was doing.

    The main executable (twl.py) is a mess that was meant to only be temporary until I finish writing a proper CLI… That’s not going to happen at this rate.

    That being said it does kinda work.

    (You have to set PYTHONPATH=.. on Windows or the Linux equivalent first).

    Authenticate with Twitch (follow on-screen instructions)

    $ py -3.6 twl.py --auth
    

    (Authentication information will be saved in $HOME/twl.json on Linux or %USERPROFILE%/twl.json on Windows)

    List games:

    $ py -3.6 twl.py --list --sort


    Create aria2c file to download a game

    $ py -3.6 twl.py -v --install --install-base-dir "twitch" --aria2c --aria2c-file "/tmp/dllist.txt" --game-id <ID>
    

    This will also print the aria2c command to download the game.

    I left some debug/test code in there that shows how updating/patching works in theory. But I never got around to implementing that.


    Old README before I gave up

    twl.py (Twitch Launcher.py)

    A lightweight, multiplatform downloader/installer/updater for games available through the Twitch App.

    Motivation

    I wanted to have a simple, fairly lightweight way of downloading and running the (free) games I got through Twitch Prime without the Twitch App.

    Why?

    • Twitch App is Windows only
    • Twitch App is bloated (Twitch player, Discord clone, WoW/minecraft mod manager, and game distribution platform)
    • Twitch App is slow and requires an update nearly every launch (yay Electron)
    • Most Games are DRM free and don’t require the App

    Features, Scope and ToDo

    Already implemented:

    • Login through Twitch directly (no browser required*)
    • Amazon SDS APIs
    • Parsing v1/v2 manifests
    • Download list exporter for aria2c
    • Delta Patching (untested)

    *Unless manual CAPTCHA solving is required.

    Missing features:

    • Downloader
    • Updater
    • Installer (creating shortcuts, running redist installers, etc.)

    Out-of-scope/Not planned:

    • FuelPump stuff for DRM and online play

    ToDo

    • Rewrite main twl.py file (currently hacked together so it kinda works but pretty ugly)
    • Tests
    • pipenv file
    • setup.py file
    • more testing
      • Linux
      • Updating (v1 normal, v2 normal and delta)

    Visit original content creator repository
    https://github.com/derrod/twl.py

  • ScrollKit

    Project Icon

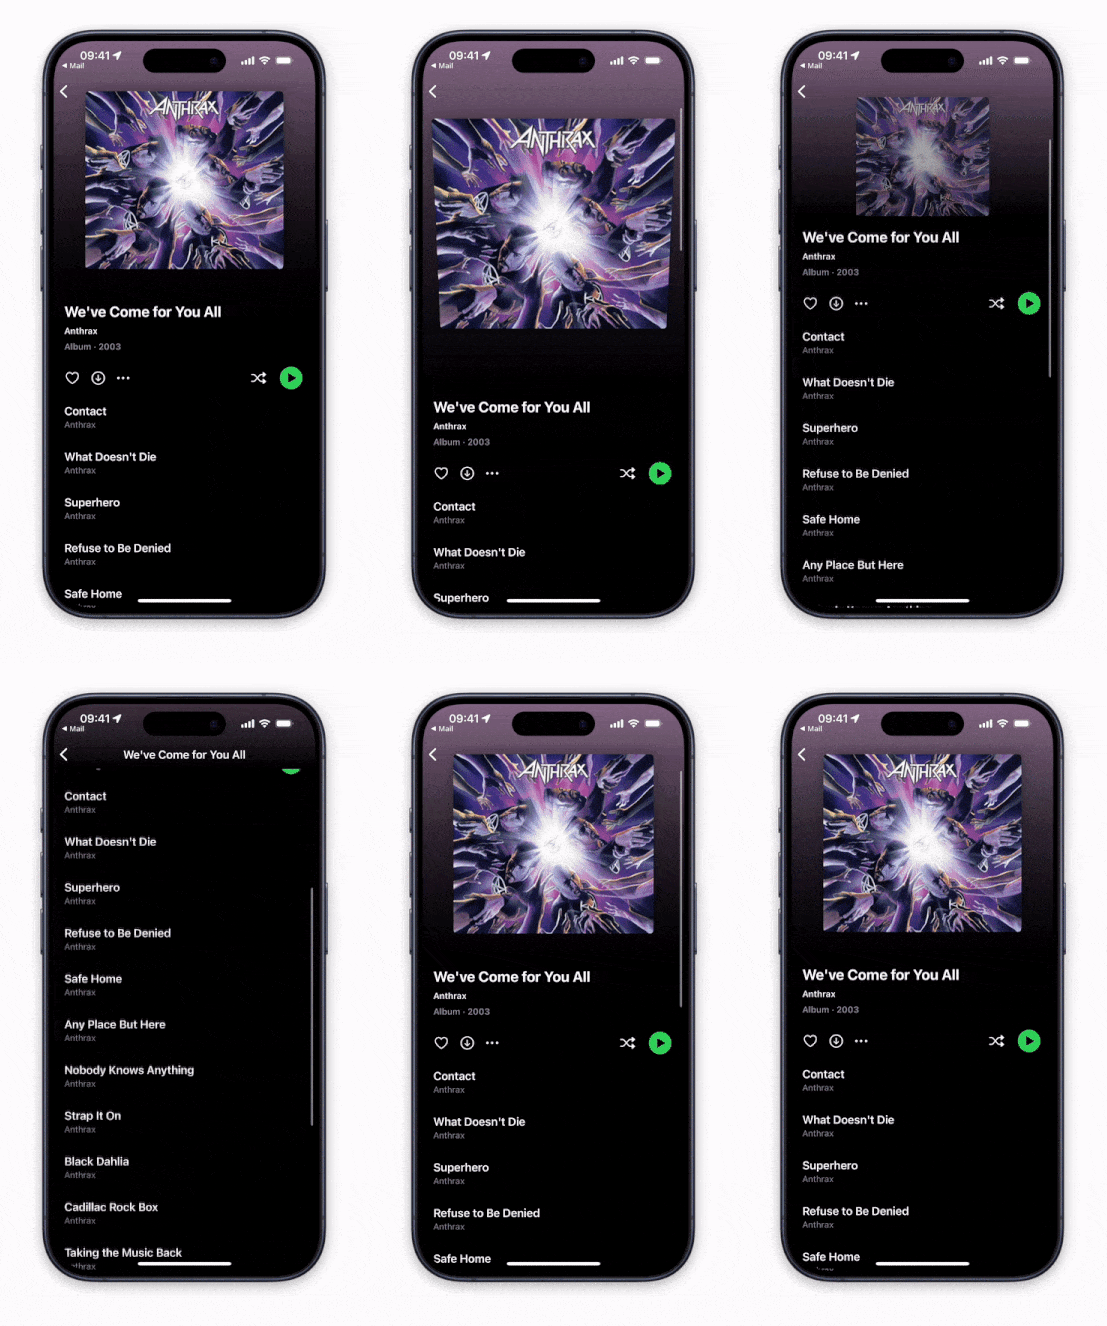
    Version Swift 6.0 Swift UI Documentation MIT License Sponsor my work

    ScrollKit

    ScrollKit is a SwiftUI library that adds powerful scroll features, like offset tracking and a header view that stretches & transforms as you pull down, and sticks to the top when you scroll.

    ScrollKit works on all major Apple platforms and is designed to be easy to use. It doesn’t use the new ScrollView APIs for backwards compatibility reasons, but will eventually do so.

    Installation

    ScrollKit can be installed with the Swift Package Manager:

    https://github.com/danielsaidi/ScrollKit.git
    

    Support My Work

    You can become a sponsor to help me dedicate more time on my various open-source tools. Every contribution, no matter the size, makes a real difference in keeping these tools free and actively developed.

    Getting started

    ScrollKit has a ScrollViewWithOffsetTracking that can detect scrolling on all OS versions:

    ScrollViewWithOffsetTracking { offset in
        print(offset)
    } content: {
        // Add your scroll content here, e.g. a `LazyVStack`
    }

    ScrollKit has a ScrollViewWithStickyHeader that makes it easy to set up a stretchy, sticky header:

    import SwiftUI
    import ScrollKit
    
    struct MyView: View {
    
        @State
        private var scrollOffset = CGPoint.zero
    
        @State
        private var visibleRatio = CGFloat.zero
    
        var body: some View {
            ScrollViewWithStickyHeader(
                header: stickyHeader,   // A header view
                headerHeight: 250,      // The resting header height
                headerMinHeight: 150,   // The minimum header height
                headerStretch: false,   // Disables the stretch effect
                contentCornerRadius: 20, // An optional corner radius mask
                onScroll: handleScroll  // An optional scroll handler action
            ) {
                // Add your scroll content here, e.g. a `LazyVStack`
            }
        }
    
        func handleScroll(_ offset: CGPoint, visibleHeaderRatio: CGFloat) {
            self.scrollOffset = offset
            self.visibleRatio = visibleHeaderRatio
        }
    
        func stickyHeader() -> some View {
            ZStack {
                Color.red
                ScrollViewHeaderGradient()  // By default a dark gradient
                Text("Scroll offset: \(scrollOffset.y)")
            }
        }
    }

    For more information, please see the getting started guide.

    Documentation

    The online documentation has more information, articles, code examples, etc.

    Demo Application

    The demo app lets you explore the library. To try it out, just open and run the Demo project.

    Contact

    Feel free to reach out if you have questions or want to contribute in any way:

    License

    ScrollKit is available under the MIT license. See the LICENSE file for more info.

    Visit original content creator repository https://github.com/danielsaidi/ScrollKit
  • swift-cpu-info

    swift-cpu-info

    A Swift library for getting CPU informations

    Github issues Github forks Github stars Github top language

    Note

    Currently only works on Apple platform.

    Usage

    print

    import CPUInfo
    CPUInfo.print()
    Type: CPU_TYPE_X86_64
    SubType: CPU_SUBTYPE_X86_ARCH1
    Family: CPUFAMILY_INTEL_WESTMERE
    SubFamily: CPUSUBFAMILY_UNKNOWN
    ThreadType: Unknown
    Is64Bit: true
    Brand: Apple M3 Pro
    Vendor: Unknown
    isTranslated: true
    ActualCPUType: CPU_TYPE_ARM64
    Features: ["FPU", "VME", "DE", "PSE", "TSC", "MSR", "PAE", "MCE", "CX8", "APIC", "SEP", "MTRR", "PGE", "MCA", "CMOV", "PAT", "PSE36", "CLFSH", "DS", "ACPI", "MMX", "FXSR", "SSE", "SSE2", "SS", "HTT", "TM", "PBE", "SSE3", "PCLMULQDQ", "DTSE64", "MON", "DSCPL", "VMX", "EST", "TM2", "SSSE3", "CX16", "TPR", "PDCM", "SSE4.1", "SSE4.2", "AES", "SEGLIM64"]
    FeatureBits: ["0b1001011110010100010000111010000", "0b111111111111000"]
    Performance Core:
        Name: Performance
        Physical: 5
        Logical: 5
        L1 Cache
           Instruction: 192 KB
           Data: 128 KB
        L2 Cache
           Size: 16 MB
           Cores/Cache: 5
        L3 Cache
           Size: Unknown
           Cores/Cache: Unknown
    Efficient Core:
        Name: Efficiency
        Physical: 6
        Logical: 6
        L1 Cache
           Instruction: 128 KB
           Data: 64 KB
        L2 Cache
           Size: 4 MB
           Cores/Cache: 6
        L3 Cache
           Size: Unknown
           Cores/Cache: Unknown
    

    License

    swift-cpu-info is released under the MIT License. See LICENSE

    Visit original content creator repository https://github.com/p-x9/swift-cpu-info
  • Engine

    Keep-Current

    Codacy Badge BCH compliance Build Status

    Recommendation Engine

    This repository is the documents personalized recommendation engine of the Keep-Current project.

    Potential tools to implement

    We lean heavily on existing tools as well as developing new methods. We are colaborating through Google Colab notebooks.

    Getting started

    for running this project locally, you need first to install the dependency packages. To install them, you can use

    Installation using pipenv (which combines virtualenv with pip)

    Install pipenv

    # if you haven't installed pip
    sudo easy_install pip
    # install pipenv
    pip install pipenv
    
    # with homebrew (on macOS)
    brew install pipenv

    Install the packages and run the server

    # install all packages
    pipenv install
    # run the server
    pipenv run python manage.py server

    Installing using Anaconda

    If you have anaconda installed, it’s recommended to create an environment for the project, and install the dependencies in it.

    # create the environment
    conda create -q -n web-miner python=3.6
    
    # activate the environment
    source activate web-miner
    
    # install the packages
    pip install -r requirements.txt

    and test your installation by running the web server:

    # start server
    python manage.py server

    Architecture

    Project Architecture

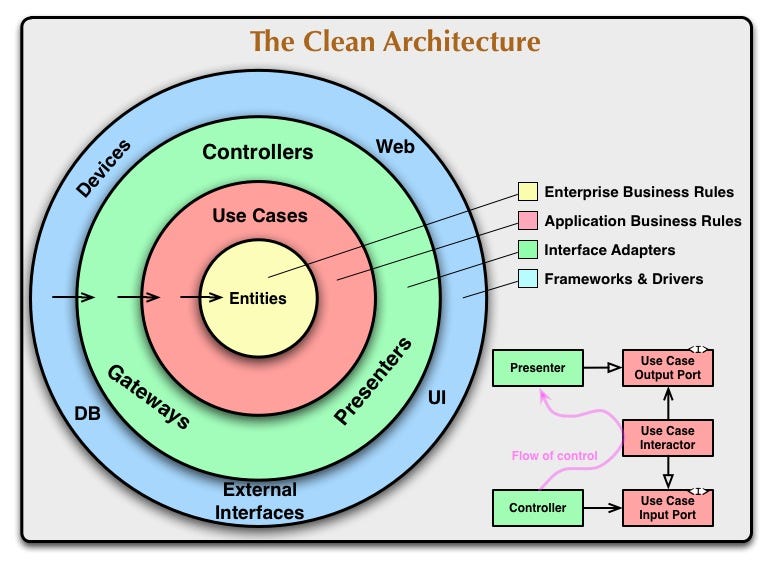
    We follow the clean architecture style and structure the codebase accordingly.

    cleanArchitecture image

    Image credit to Uncle Bob

    Most important rule:

    Source code dependencies can only point inwards. Nothing in an inner circle can know anything at all about something in an outer circle. In particular, the name of something declared in an outer circle must not be mentioned by the code in the an inner circle. That includes, functions, classes. variables, or any other named software entity.

    Who are we?

    This project intends to be a shared work of meetup members, with the purpose, beside the obvious result, to also be used as a learning platform, while advancing the Natural Language Processing / Machine Learning field by exploring, comparing and hacking different models.

    Please visit

    • the project board on Github
    • the repository board on Github
    • our chat room on Slack. If you’re new, you can join using this link
    • our facebook group where we discuss and share current topics also outside of the project

    for more.

    How to Contribute

    You can find our Project board here on GitHub and we use Slack as our communication channel. If you’re new, you can join using this link

    We welcome anyone who would like to join and contribute.

    Please see our contribute guide.

    We meet regularly every month in Vienna through

    to show our progress and discuss the next steps.

    Keep-Current Project

    After studying a topic, keeping current with the news, published papers, advanced technologies and such proved to be a hard work. One must attend conventions, subscribe to different websites and newsletters, go over different emails, alerts and such while filtering the relevant data out of these sources.

    In this project, we aspire to create a platform for students, researchers, professionals and enthusiasts to discover news on relevant topics. The users are encouraged to constantly give a feedback on the suggestions, in order to adapt and personalize future results.

    The goal is to create an automated system that scans the web, through a list of trusted sources, classify and categorize the documents it finds, and match them to the different users, according to their interest. It then presents it as a timely summarized digest to the user, whether by email or within a site.

    If you wish to assist in different aspects (Data Engineering / Web development / DevOps), we have divided the project to several additional repositories focusing on these topics:

    • The mining of data is done in the Web-Miner repository
    • Web Development & UI/UX experiments can be found in our App repository
    • Data Engineering tasks are more than welcomed in our Data Engineering repository
    • Devops tasks are all across the project. This project is developed mostly in a serverless architecture. Using Docker and Kubernetes enables freedom in deploying it on different hosting providers and plans.

    Feel free to join the discussion and provide your input!

    About Machine Learning

    Machine Learning & Natural Language Processing

    If you’re new to Machine Learning, we suggest reading the following sources:

    Visit original content creator repository https://github.com/Keep-Current/Engine
  • drauth

    DRAUTH

    DrAuth is a Django application template that provides a complete authentication
    system out of the box. With DrAuth, you can quickly and easily add user
    registration, login, logout, password reset, and email verification functionality
    to your Django projects.

    DrAuth is built using modern Django best practices,
    including class-based views, forms, and templates.
    It also includes custom user models and email templates that are designed
    to be easily customized to fit your specific needs.

    • User registration with email verification

    • Login and logout functionality

    • Password reset functionality

    • Custom user model with email as the username field

    • Easy integration with existing Django projects

    • With DrAuth, you can save time and effort by not having to build an
      authentication system from scratch. Instead, you can focus on building the
      unique features of your application while relying on a secure and reliable
      authentication system.

    DrAuth is open source and free to use, so feel free to download it and use it in your projects. If you encounter any issues or have any suggestions for improvement, please open an issue or submit a pull request on GitHub.

    SETUP

    Installing Dependencies:

    pip install -r requirements.txt

    Adding your own apps:

    create your own apps via python manage.py startapp 'app_name' and
    make api/ directory inside the app directory app_name/api/
    and create all those files. Do it easily by the command below:

    touch __init__.py urls.py views.py serializers.py

    Note: If your app seems complex, then you can create separated
    directories inside the api/ folder for views and serializers

    DOCS

    Django Dependency list into the INSTALLED_APPS in settings.py of your django project.

    # 3rd-party apps
    'allauth',
    'allauth.account',
    'rest_framework',
    'rest_framework.authtoken',
    'rest_framework_simplejwt.token_blacklist',
    'dj_rest_auth',
    'dj_rest_auth.registration',
    'corsheaders',
    'drf_spectacular',
        
    # local apps
    'core.apps.CoreConfig',
    'credentials.apps.CredentialsConfig'

    Here the core app is just the base app with nothing there. It’s just for you to get started

    Default Django settings:

    These are the recommended settings to run everything correctly. Still, you can slightly change
    few settings. Follow the official Django docs to modify these settings.

    # Default Django Settings
    SITE_ID = 1
    SESSION_COOKIE_SECURE = True
    CSRF_COOKIE_SECURE = True
    SESSION_COOKIE_SAMESITE = 'None'
    CSRF_COOKIE_SAMESITE = 'None'

    REST Framework settings:

    To update our REST settings easily from anywhere, we make a blank dictionary,
    and we’ll update it later by our needs.

    # REST Settings
    REST_FRAMEWORK = {}

    Spectacular setup:

    In your settings.py file, make sure these settings exist for spectacluar package.

    # Drf-spectacular
    REST_FRAMEWORK.update({'DEFAULT_SCHEMA_CLASS': 'drf_spectacular.openapi.AutoSchema'})
    SPECTACULAR_SETTINGS = {
        'TITLE': 'DjRestAuth',
        'DESCRIPTION': 'DjrestAUTH + React',
        'VERSION': '1.0.0',
        'SERVE_INCLUDE_SCHEMA': False,
    }

    core/api/urls.py

    from django.urls import path
    from drf_spectacular.views import SpectacularAPIView, SpectacularSwaggerView
    
    docs = [
        # YOUR PATTERNS
        path('schema/', SpectacularAPIView.as_view(), name='schema'),
        # Optional UI:
        path('', SpectacularSwaggerView.as_view(url_name='schema'), name='swagger-ui'),
    ]

    Cors-headers:

    settings.py

    from corsheaders.defaults import default_headers
    
    # update MIDDLEWARE
    MIDDLEWARE = [
        'django.middleware.security.SecurityMiddleware',
        'django.contrib.sessions.middleware.SessionMiddleware',
        'corsheaders.middleware.CorsMiddleware', #new
        'django.middleware.common.CommonMiddleware',
        'django.middleware.csrf.CsrfViewMiddleware',
        'django.contrib.auth.middleware.AuthenticationMiddleware',
        'django.contrib.messages.middleware.MessageMiddleware',
        'django.middleware.clickjacking.XFrameOptionsMiddleware',
    ]
    
    # cors-headers
    CORS_ALLOWED_ORIGINS = [
        "http://localhost:3000",
        "http://localhost:8000",
        "http://localhost:8080",
        "http://127.0.0.1:3000",
        "http://127.0.0.1:8000",
        "http://127.0.0.1:8080",
    ]
    CORS_ALLOW_CREDENTIALS = True
    CORS_ALLOW_HEADERS = list(default_headers) + ['Set-Cookie']

    AllAuth:

    settings.py

    # django-allauth
    ACCOUNT_AUTHENTICATION_METHOD = "email"
    ACCOUNT_EMAIL_REQUIRED = True
    ACCOUNT_USERNAME_REQUIRED = False
    AUTHENTICATION_BACKENDS = [
        # Needed to login by username in Django admin, regardless of `allauth`
        'django.contrib.auth.backends.ModelBackend',
        # `allauth` specific authentication methods, such as login by e-mail
        'allauth.account.auth_backends.AuthenticationBackend',
    ]
    EMAIL_BACKEND = 'django.core.mail.backends.console.EmailBackend'

    SimpleJWT

    settings.py

    # Simple-JWT
    REST_USE_JWT = True
    JWT_AUTH_COOKIE = 'access'
    JWT_AUTH_REFRESH_COOKIE = 'refresh'
    SIMPLE_JWT = {
        'ACCESS_TOKEN_LIFETIME': timedelta(minutes=1),
        'REFRESH_TOKEN_LIFETIME': timedelta(days=90),
        'ROTATE_REFRESH_TOKENS': True,
        'BLACKLIST_AFTER_ROTATION': True,
    
        'AUTH_HEADER_TYPES': ('Bearer',),
        'AUTH_HEADER_NAME': 'HTTP_AUTHORIZATION',
    }

    dj-rest-auth:

    settings.py

    # dj-rest-auth
    REST_FRAMEWORK.update({
        'DEFAULT_AUTHENTICATION_CLASSES': (
            'dj_rest_auth.jwt_auth.JWTCookieAuthentication',
        )
    })
    JWT_AUTH_SECURE = True
    JWT_AUTH_SAMESITE = 'None'

    credentials/api/urls.py

    urlpatterns = [
        path('auth/', include('dj_rest_auth.urls')),
        path('auth/registration/', include('dj_rest_auth.registration.urls')),
    ]

    Migrations:

    ./manage.py makemigrations
    ./manage.py migrate

    Refresh token [GET]

    credentials/api/views.py

    from rest_framework_simplejwt.tokens import RefreshToken
    from django.http import JsonResponse
    
    
    def get_tokens_for_user(request):
        refresh = RefreshToken.for_user(request.user)
        print(f'token for {request.user}',refresh.access_token)
        return JsonResponse({
            'refresh_token': str(refresh),
            'access_token': str(refresh.access_token),
        })

    credentials/api/urls.py

    from django.urls import path
    from credentials.api.views import get_tokens_for_user
    
    urlpatterns = [
        ...
        path('get/refresh/', get_tokens_for_user)
    ]

    Visit original content creator repository
    https://github.com/teamhashed/drauth

  • self-supervised-3-DPCNN

    self-supervised-3-DPCNN

    W. Cao, Y. Shi, W. Wang, X. Guo, F. Tian and Y. Zhao, “Self-Supervised Multitask 3-D Partial Convolutional Neural Network for Random Noise Attenuation and Reconstruction in 3-D Seismic Data,” in IEEE Transactions on Geoscience and Remote Sensing, vol. 60, pp. 1-19, 2022, Art no. 5924619, doi: 10.1109/TGRS.2022.3225923.

    Our code is based on the code corresponding to the article:
    (1) Y. Quan, M. Chen, T. Pang, et al. “Self2self with dropout: Learning self-supervised denoising from single image,” in Proceedings of the IEEE/CVF conference on computer vision and pattern recognition, 2020, pp. 1890–1898.

    We use the following algorithms as the benchmark algorithms:
    (2) S. Yu, J. Ma, X. Zhang, et al. “Interpolation and denoising of high-dimensional seismic data by learning a tight frame,” Geophysics, vol. 80, no. 5, pp. V119–V132, 2015.
    (3) Y. Chen, W. Huang, D. Zhang, et al. “An open-source matlab code package for improved rank-reduction 3d seismic data denoising and reconstruction,” Computers & Geosciences, vol. 95, pp. 59–66, 2016.
    (4) O. M. Saad, Y. A. S. I. Oboué, M. Bai, et al. “Self-attention deep image prior network for unsupervised 3-d seismic data enhancement,” IEEE Transactions on Geoscience and Remote Sensing, 2021.
    (5) F. Kong, F. Picetti, V. Lipari, et al. “Deep prior-based unsupervised reconstruction of irregularly sampled seismic data,” IEEE Geoscience and Remote Sensing Letters, 2020.

    Data from the articles:
    (6) O. M. Saad, Y. A. S. I. Oboué, M. Bai, et al. “Self-attention deep image prior network for unsupervised 3-d seismic data enhancement,” IEEE Transactions on Geoscience and Remote Sensing, 2021.
    (7) L. Yang, S. Wang, X. Chen, et al. “Unsupervised 3-d random noise attenuation using deep skip autoencoder,” IEEE Transactions on Geoscience and Remote Sensing, 2021.
    and https://wiki.seg.org/wiki/Open_data

    We thank the above scholars for opening their codes!

    Visit original content creator repository
    https://github.com/caowei2020/self-supervised-3-DPCNN

  • NLP-Project-VisualQuesGen

    README

    Visual Question Generation task adapted from Microsoft -> https://arxiv.org/abs/1603.06059

    Work began -> Summer 2018 (at the time code / exact technical specs for task unavailable)

    • Danish Farid (currently @ U Waterloo) – LUMS (SBASSE)
    • Rabeez Riaz (currently @ McKinsey & Co.) – LUMS (SBASSE)

    Work conducted:

    1. Downloading dataset from -> https://www.microsoft.com/en-us/download/details.aspx?id=53670
        - Custom script used to avoid trying to download images from dead links (using http get requests)
        - 
    
    2. Data Cleaning along standard methods: 
        - Running a final check for data that had incorrect question data -> found a few rows without correct questions
        - Removing quotation marks and excess formatting
        - normalizing letter-case
        - Adding start and end tokens
        - Building a vocabulary dictionary for [word -> integer] mapping (numerical data)
        - Converting all list of strings to list of integers using vocab dictionary 
        - Converting raw (variable length) sentences into constant length slices - (length determines by max length of sentences)
            - A RNN works by having training data for a single sample at multiple time slices 
            - we went ahead and slowly "revealed" our training example sentences one token at a time, filling them 
            with Stop Tokens before that:
            
            Example dataset
            Max Length: 5 (including start token)
            
            __image: img_1.jpeg (one image)__ 
            
            Before: 
                "What is that man?"
            
            After (all tokens replaced with their integer representation):
                0/ <START> <STOP> <STOP> <STOP> <STOP> <STOP>
                1/ <START> what <STOP> <STOP> <STOP> <STOP>
                2/ <START> what is <STOP> <STOP> <STOP>
                3/ <START> what is that <STOP> <STOP>
                4/ <START> what is that man <STOP>
        
    
    3. Rebuilding microsoft model
        - Picecing together the VQG Microsoft model from overall information from MS paper and using Keras 
           documentation to find ways to implement features
        - Tried several methods for feeding auxiliary picture data to  
            -> including embedding data into each row of an image data
            -> 
        - Found way to include data as aux information
    
    
    4. Model definition 
        Overall model hierarchy
        
            1. Image and Sentence information 
            2. VGG-16 With last layer removed (INPUT: image) - (OUTPUT: 500 length feature vector)
            3. RNN layer (LSTM/GRU units) -> 
                (X data: Sentence pushed thru an embedding), (Y data: Next word), (Side information: Picture features)
        
        Every training sample is:
        
        -> The image is read and is run through a VGG-16 with it's last layer removed -> so every imager returns 
        a high level feature vector of (length = 500). 
        
        -> This feature vector is used as "side information" to the RNN and is the recursively modified data value over each recurrent run
        
    5. Testing
        -> Model trained on a 1080Ti for 25 epochs -> details and results in notebook
        -> Other details available in all reports
    
    5. Other work conducted
        -> We noticed that questions are not exactly open-ended sentences and that there must be a significant pattern to exploit (a form of questions to expect), a question starting with the word "Watermelon" is unlikely and so the model need not account for this as well. 
    
        A word map in the report -> {} contains a word map that shows a visualization for our questions vocabulary corpus indicating that at the first position, questions were mostly only composed to a few different words. 
    
        We tried to find a way to exploit this property by also providing a 1 dim "prevailance" vector to our model is auxiliary information, with the expection that this might speed up model testing and guide the optimization algo to a better minima sooner.
    
        We were, due to lack of availability of compute resource, not able to test this extensively but, after a few tests, our models reached a lower loss value faster (approx 15% sooner) or at the same rate as they did without this "prior" vector information being passed, depending on how the prior infomration was provided
    
    
    6. Possible future work -> 
        -> A heavy emphasis on this 'prior' dataset information holds potential to be able to speed up models being trained on a certain type of general data. "Questions" for instance as a subset or a certain 'type' of sentence. 
    

    Visit original content creator repository
    https://github.com/danishnxt/NLP-Project-VisualQuesGen

  • localize_and_translate

    localize_and_translate

    Flutter localization in easy steps, eas

    License Pub Example

    PUB GitHub stars GitHub forks

    Getting Started

    🔩 Installation

    Add to your pubspec.yaml:

    dependencies:
      localize_and_translate: <last_version>

    Create folder and add translation files like this

    assets
    └── lang
        ├── {languageCode}.{ext}                  //only language code
        └── {languageCode}-{countryCode}.{ext}    //or full locale code
    

    Example:

    assets
    └── lang
        ├── en.json
        └── en-US.json 
    

    Declare your assets localization directory in pubspec.yaml:

    flutter:
      assets:
        - assets/lang/

    ⚠️ Note on iOS

    For translation to work on iOS you need to add supported locales to ios/Runner/Info.plist as described here.

    Example:

    <key>CFBundleLocalizations</key>
    <array>
      <string>en</string>
      <string>nb</string>
    </array>

    ⚙️ Configuration

    Add LocalizedApp widget like in example

    import 'package:flutter/material.dart';
    import 'package:localize_and_translate/localize_and_translate.dart';
    
    void main() async {
      WidgetsFlutterBinding.ensureInitialized();
        await LocalizeAndTranslate.init(
            assetLoader: const AssetLoaderRootBundleJson('assets/lang/'), // <-- change the path of the translation files
            supportedLanguageCodes: <String>['ar', 'en'], // <-- or supportedLocales: [Locale('ar', 'EG'), Locale('en', 'US')],
        );
      
        runApp(
            LocalizedApp(
                child: MaterialApp(
                  // style 1
                  builder: LocalizeAndTranslate.directionBuilder,
                  // style 2
                  builder: (BuildContext context, Widget? child) {
                    child = LocalizeAndTranslate.directionBuilder(context, child);
            
                    return child;
                  },
                  home: const MyHomePage(),
                  locale: context.locale,
                  localizationsDelegates: context.delegates,
                  supportedLocales: context.supportedLocales,
                ),
            ),
        );
    }

    Full example

    📜 Localize And Translate init properties

    Properties Required Description
    supportedLanguageCodes or next List of supported languages to be converted to locales.
    supportedLocales or prev List of supported locales.
    assetLoader true Class loader for localization values. You can create your own class.
    assetLoadersExtra true Class loader for localization values. You can create your own class.
    defaultType false Path to your folder with localization files.
    mapper false Mapper for localization values. You can create your own class.
    hivePath false Path to hive box.
    hiveBackendPreference false Hive backend preference.

    Usage

    Init

    Call LocalizeAndTranslate.init(params) in your main before runApp.

    void main() async{
      // ...
      // Needs to be called so that we can await for LocalizeAndTranslate.init();
      WidgetsFlutterBinding.ensureInitialized();
    
      await LocalizeAndTranslate.init(
        assetLoader: const AssetLoaderRootBundleJson('assets/lang/'), // <-- change the path of the translation files
        supportedLocales: <Locale>[Locale('ar', 'EG'), Locale('en', 'US')], // <-- or  supportedLanguageCodes: <String>['ar', 'en'],
        defaultType: LocalizationDefaultType.asDefined, // <-- change the default type
      );
      // ...
      runApp(
        // ...
      );
      // ...
    }

    or over network

    void main() async{
      // ...
      // Needs to be called so that we can await for LocalizeAndTranslate.init();
      WidgetsFlutterBinding.ensureInitialized();
    
      await LocalizeAndTranslate.init(
        assetLoader: const AssetLoaderNetwork({
          'ar': 'https://raw.githubusercontent.com/msayed-net/localize_and_translate/main/example/assets/lang/ar.json',
          'en': 'https://raw.githubusercontent.com/msayed-net/localize_and_translate/main/example/assets/lang/en.json',
        }),
        supportedLocales: <Locale>[Locale('ar', 'EG'), Locale('en', 'US')],
        defaultType: LocalizationDefaultType.asDefined,
      );
      // ...
      runApp(
        // ...
      );
      // ...
    }

    context extensions

    LocalizeAndTranslate uses extension methods [BuildContext] for access to some values.

    Example:

    // set locale
    context.setLocale(Locale('en', 'US'));
    
    // set language code
    context.setLanguageCode('en');
    
    // get locale
    context.locale; // en_US
    
    // get language code
    context.languageCode; // en

    Translate tr()

    Main function for translate your language keys

    print('title'.tr(defaultValue: 'Awesome App')); //String

    Translations

    as json values pair

    {
      "title": "Awesome App",
      "hello": "Hello",
      "world": "World!",
    }

    API Reference

    Properties Extension Type Description
    countryCode context Property Gets the country code of the current locale.
    delegates context Property Gets the list of localization delegates used for translation.
    init no Method Initializes the plugin with the desired configuration values.
    locale context Property Gets the current locale being used for localization.
    resetLocale context Method Resets the current locale to its default value.
    setLanguageCode context Method Sets the language code for localization.
    setLocale context Method Sets the current locale to one of the supported locales.
    supportedLocales context Property Gets the list of supported locales for the app.
    getKeys context Method Retrieves the list of keys for the current localization file.
    tr string Method Retrieves the translated string for a given localization key.

    Reset everything to default values passed through init().

    Example:

    RaisedButton(
      onPressed: (){
        context.resetLocale();
      },
      child: Text(LocaleKeys.reset_locale).tr(),
    )
    Visit original content creator repository https://github.com/msayed-net/localize_and_translate
  • localize_and_translate

    localize_and_translate

    Flutter localization in easy steps, eas

    License
    Pub
    Example

    PUB
    GitHub stars
    GitHub forks

    Getting Started

    🔩 Installation

    Add to your pubspec.yaml:

    dependencies:
      localize_and_translate: <last_version>

    Create folder and add translation files like this

    assets
    └── lang
        ├── {languageCode}.{ext}                  //only language code
        └── {languageCode}-{countryCode}.{ext}    //or full locale code
    

    Example:

    assets
    └── lang
        ├── en.json
        └── en-US.json 
    

    Declare your assets localization directory in pubspec.yaml:

    flutter:
      assets:
        - assets/lang/

    ⚠️ Note on iOS

    For translation to work on iOS you need to add supported locales to
    ios/Runner/Info.plist as described here.

    Example:

    <key>CFBundleLocalizations</key>
    <array>
      <string>en</string>
      <string>nb</string>
    </array>

    ⚙️ Configuration

    Add LocalizedApp widget like in example

    import 'package:flutter/material.dart';
    import 'package:localize_and_translate/localize_and_translate.dart';
    
    void main() async {
      WidgetsFlutterBinding.ensureInitialized();
        await LocalizeAndTranslate.init(
            assetLoader: const AssetLoaderRootBundleJson('assets/lang/'), // <-- change the path of the translation files
            supportedLanguageCodes: <String>['ar', 'en'], // <-- or supportedLocales: [Locale('ar', 'EG'), Locale('en', 'US')],
        );
      
        runApp(
            LocalizedApp(
                child: MaterialApp(
                  // style 1
                  builder: LocalizeAndTranslate.directionBuilder,
                  // style 2
                  builder: (BuildContext context, Widget? child) {
                    child = LocalizeAndTranslate.directionBuilder(context, child);
            
                    return child;
                  },
                  home: const MyHomePage(),
                  locale: context.locale,
                  localizationsDelegates: context.delegates,
                  supportedLocales: context.supportedLocales,
                ),
            ),
        );
    }

    Full example

    📜 Localize And Translate init properties

    Properties Required Description
    supportedLanguageCodes or next List of supported languages to be converted to locales.
    supportedLocales or prev List of supported locales.
    assetLoader true Class loader for localization values. You can create your own class.
    assetLoadersExtra true Class loader for localization values. You can create your own class.
    defaultType false Path to your folder with localization files.
    mapper false Mapper for localization values. You can create your own class.
    hivePath false Path to hive box.
    hiveBackendPreference false Hive backend preference.

    Usage

    Init

    Call LocalizeAndTranslate.init(params) in your main before runApp.

    void main() async{
      // ...
      // Needs to be called so that we can await for LocalizeAndTranslate.init();
      WidgetsFlutterBinding.ensureInitialized();
    
      await LocalizeAndTranslate.init(
        assetLoader: const AssetLoaderRootBundleJson('assets/lang/'), // <-- change the path of the translation files
        supportedLocales: <Locale>[Locale('ar', 'EG'), Locale('en', 'US')], // <-- or  supportedLanguageCodes: <String>['ar', 'en'],
        defaultType: LocalizationDefaultType.asDefined, // <-- change the default type
      );
      // ...
      runApp(
        // ...
      );
      // ...
    }

    or over network

    void main() async{
      // ...
      // Needs to be called so that we can await for LocalizeAndTranslate.init();
      WidgetsFlutterBinding.ensureInitialized();
    
      await LocalizeAndTranslate.init(
        assetLoader: const AssetLoaderNetwork({
          'ar': 'https://raw.githubusercontent.com/msayed-net/localize_and_translate/main/example/assets/lang/ar.json',
          'en': 'https://raw.githubusercontent.com/msayed-net/localize_and_translate/main/example/assets/lang/en.json',
        }),
        supportedLocales: <Locale>[Locale('ar', 'EG'), Locale('en', 'US')],
        defaultType: LocalizationDefaultType.asDefined,
      );
      // ...
      runApp(
        // ...
      );
      // ...
    }

    context extensions

    LocalizeAndTranslate uses extension methods [BuildContext] for access to some values.

    Example:

    // set locale
    context.setLocale(Locale('en', 'US'));
    
    // set language code
    context.setLanguageCode('en');
    
    // get locale
    context.locale; // en_US
    
    // get language code
    context.languageCode; // en

    Translate tr()

    Main function for translate your language keys

    print('title'.tr(defaultValue: 'Awesome App')); //String

    Translations

    as json values pair

    {
      "title": "Awesome App",
      "hello": "Hello",
      "world": "World!",
    }

    API Reference

    Properties Extension Type Description
    countryCode context Property Gets the country code of the current locale.
    delegates context Property Gets the list of localization delegates used for translation.
    init no Method Initializes the plugin with the desired configuration values.
    locale context Property Gets the current locale being used for localization.
    resetLocale context Method Resets the current locale to its default value.
    setLanguageCode context Method Sets the language code for localization.
    setLocale context Method Sets the current locale to one of the supported locales.
    supportedLocales context Property Gets the list of supported locales for the app.
    getKeys context Method Retrieves the list of keys for the current localization file.
    tr string Method Retrieves the translated string for a given localization key.

    Reset everything to default values passed through init().

    Example:

    RaisedButton(
      onPressed: (){
        context.resetLocale();
      },
      child: Text(LocaleKeys.reset_locale).tr(),
    )

    Visit original content creator repository
    https://github.com/msayed-net/localize_and_translate

  • AppUpdater

    AppUpdater

    Project Description Providing application update feature to your DotNet desktop application requires a fair amount of planning and effort. Observation shows that many internal and external enterprise desktop applications are required to update as and when development teams enhance their applications. Consequently, even moderately sized applications can offer best user experience by delivery updates in timely manner without user involvement. Considering the importance of application updates to desktop applications, it becomes imperative to provide an intelligent application updater program to update software installed at client’s machine.

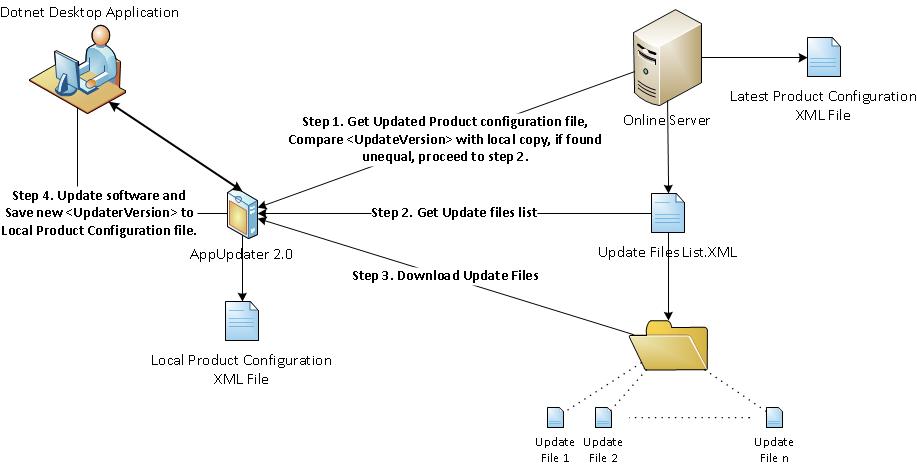
    AppUpdater 2.0 High Level Understanding Diagram AppUpdater 2.0

    The AppUpdater is XML based configuration driven, ready to integrate, simple and easy to understand piece of utility for DotNet desktop applications.

    The AppUpdate is designed to provide a “no touch” solution to the problem of keeping .NET desktop applications up to date in enterprise and home user environments. You can use it out-of–the-box to perform the downloading and activation of updates for your applications. I intend to keep its implementation simple and straight forward, Application development teams or individuals can easily integrate AppUpdater with their existing and future .NET applications. Ship AppUpdater with your application and control it remotely through configuration files during software updates.

    Hightlights

    – Configuration Driven: That means it does not require to study its complete architecture and write lot many lines code to integrate with your application. You just have to understand AppUpdater’s 2 configuraton files. That’s it!

    – User Orientation: Download your update files from online in asynchronous mode along with advertising your web site pages on updater window.

    – Integration: You can tweak AppUpdater demo modules and quickly-easily integrate with your dotnet desktop application.

    – Extensible: Write custom Pre and Post update actions in your favorite dotnet language and publish them, AppUpdater will run it on client machine when software update is taking place.

    – Simple: Yes, we followed ‘Keep It Simple and Stupid (KISS)’ approach.

    This component is the result of re-construction of legacy application updater component at SrushtiSoft’s lab. Any suggestions and contributions are welcome.

    SrushtiSoft http://www.srushti-soft.com/

    We have used this component in our prodcut called Quick Quest http://www.srushti-soft.com/quickquest

    Visit original content creator repository https://github.com/pavangayakwad/AppUpdater