Blog

  • AnonymousEirbot

    AnonymousEirbot

    What the fuck is this ?

    Well, it is based on a stupid idea.

    On Telegram chats, admin users can enable an option to become invisible. When the option is enabled, the admin can write messages but the user name of the written messages will be the name of the chat. Thus, nobody really knows who has written the message.

    From this feature, if everyone in the chat has the admin rights and has enabled the anonymous mode, everyone write messages with the user name of the chat name: in theory, it is impossible to know who writes what. The game is exactly to guess authors of the messages just with the content of the messages.

    This bot allows to automatically promote incoming users in the chat to give admin rights to everybody, and to enable by default the anonymous mode for everyone.
    This bot has also another feature to automatically delete messages in the chat after a configurable amount of time.
    Obviously, the bot must have corresponding admin rights to perform these features.

    Usage

    After adding the bot to a chat, an admin must give all the admin rights to the bot.

    From this point, the bot will automatically give all admin rights to all the new incoming users in the chat. Users already in the chat before the arrival of the bot will not automatically gain admin rights. The command /admin can be used for these users to obtain admin rights. Replying to a message with the command /admin give admin rights to the user who wrote the replied message.

    By default, all messages are deleted by the bot after 60 seconds. It can be configured with the /time command with a number of seconds in parameter. Example to set 1 hour:
    /time 3600

    The time value has no boundings, but timings will not be precise when setting a delete-time lower than 10s.

    When the /time command is used, all the messages currently not deleted are affected by the new delete-time configured.

    The messages written before the arrival of the bot are not automatically deleted.

    The bot will always keep the last written message in the chat. Thus, the chat will never be totally empty.

    Cloning this code

    To execute this code, you need to add a file “tokens” at the root of the repo. In this file, you need to put 2 tokens of 2 Telegram bots, on the first 2 lines. The first token is used in standard execution. The second token is used in test mode. On the third line of the file, you have to put your Telegram user ID (the number).

    To run the bot, execute main.py in AnonymousEirbot/src/. Add the option -t to run the bot in test mode. Example:
    py -3 main.py -t

    In test mode, the bot runs with the second token, and is active only in the private chat between you and the bot (that is why you need to put your Telegram ID on the third line of the tokens file).

    How it works

    The bot listens to all kind of messages in chats. When a new message is detected, the ID of the message and the date of the message are stored in a file in AnonymousEirbot/data/. The bot creates independant storage files for each chat.

    In such a storage file, the first line is used to store the id of the user who added the bot in the chat, and the number of seconds before deleting each message. Each next lines are used to store message IDs and dates.

    The bot has an alarm mechanism to delete messages. There is only one alarm mechanism for all the chats. The alarm is set to the next message to delete, from all participating chats. Thus, the bot can operate on different chats, with different delete time configurations.

    Visit original content creator repository
    https://github.com/dubicube/AnonymousEirbot

  • memoryloler

    MemoryLoler

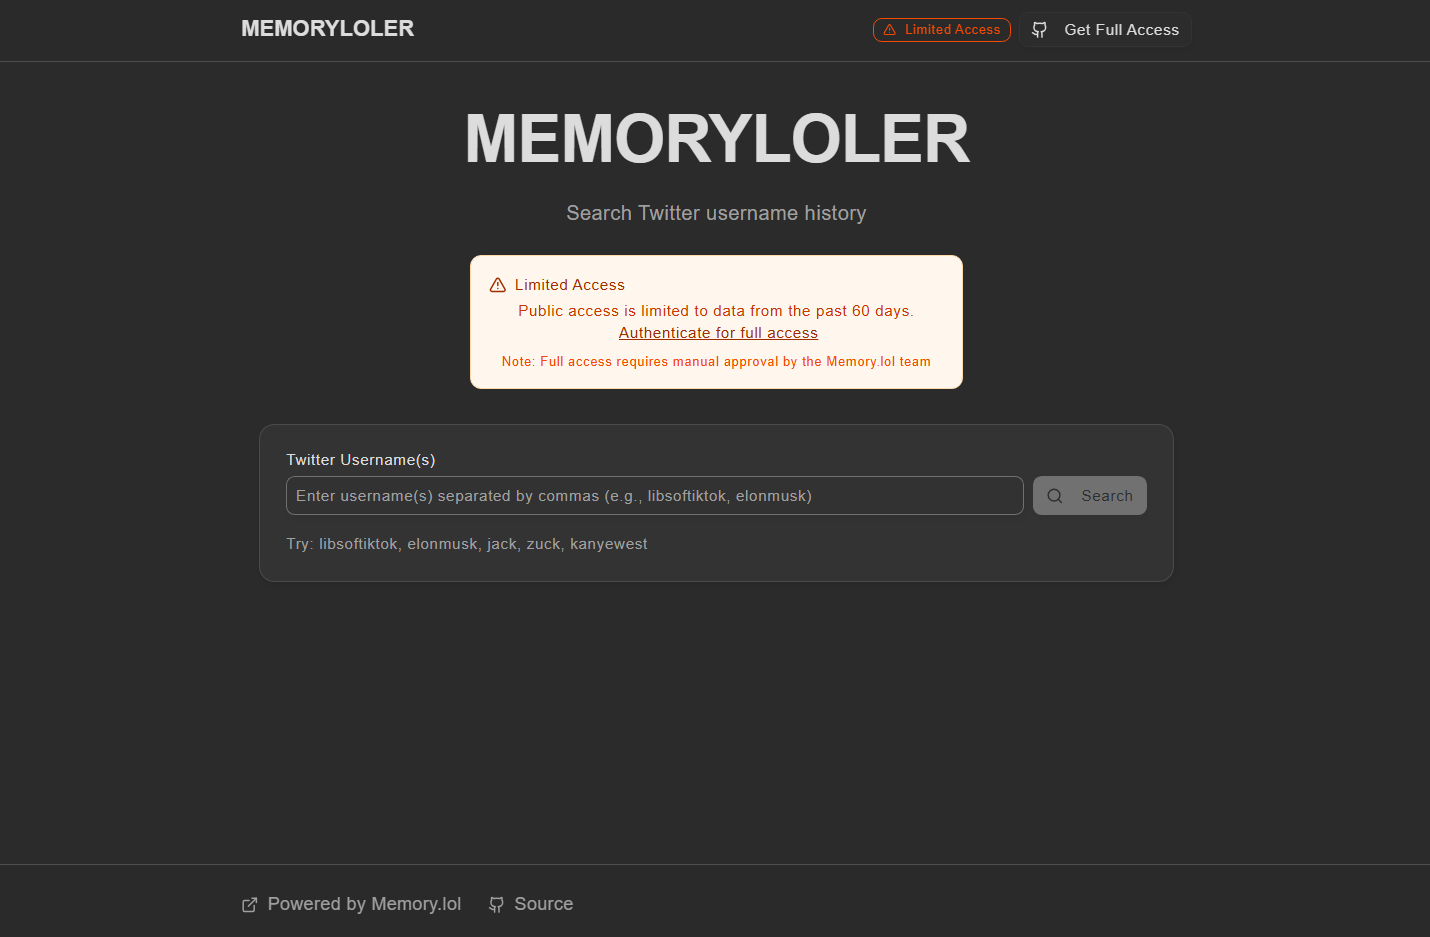
    A modern, production-grade web application for searching historical Twitter username data using the Memory.lol API. Built with Next.js 14, TypeScript, and Tailwind CSS.

    MemoryLoler

    Features

    • Historical Username Search: Look up past usernames for Twitter accounts using Memory.lol’s comprehensive database
    • GitHub Authentication: Secure OAuth integration for full access to 12 years of historical data
    • Real-time Search: Instant results with proper error handling and user feedback
    • Responsive Design: Modern, mobile-first UI built with Tailwind CSS and shadcn/ui
    • Access Control: Clear distinction between limited (60-day) and full access
    • Professional UI: Clean, intuitive interface with proper loading states and error handling

    Tech Stack

    • Framework: Next.js 14 (App Router)
    • Language: TypeScript
    • Styling: Tailwind CSS
    • UI Components: shadcn/ui
    • Authentication: GitHub OAuth Device Flow
    • API: Memory.lol REST API
    • State Management: React Hooks
    • Icons: Lucide React
    • Notifications: Sonner

    Project Structure

    src/
    ├── app/
    │   ├── api/
    │   │   ├── auth/github/route.ts    # GitHub OAuth endpoints
    │   │   └── search/route.ts         # Memory.lol search API
    │   ├── globals.css                 # Global styles
    │   ├── layout.tsx                  # Root layout
    │   ├── page.tsx                    # Main application page
    │   └── error.tsx                   # Error boundaries
    ├── components/
    │   ├── ui/                         # shadcn/ui components
    │   ├── header.tsx                  # Application header
    │   ├── footer.tsx                  # Application footer
    │   └── auth-modal.tsx              # GitHub authentication modal
    ├── hooks/                          # Custom React hooks
    ├── lib/                            # Utility functions
    └── providers/                      # React context providers
    

    Getting Started

    Prerequisites

    • Node.js 18+
    • pnpm (recommended) or npm
    • GitHub account (for full access)

    Installation

    1. Clone the repository

      git clone https://github.com/BankkRoll/memoryloler.git
      cd memoryloler
    2. Install dependencies

      pnpm install
      # or
      npm install
    3. Start the development server

      pnpm dev
      # or
      npm run dev
    4. Open your browser Navigate to http://localhost:3000

    Authentication

    Public Access

    • Limited to data from the past 60 days
    • No authentication required
    • Suitable for basic username lookups

    Full Access

    • Access to 12 years of historical data
    • Requires GitHub authentication
    • Manual approval by Memory.lol admin required
    • Available for researchers, journalists, and activists

    Getting Full Access

    1. Click “Get Full Access” in the header
    2. Complete GitHub device flow authentication
    3. Contact Memory.lol admin for approval
    4. Once approved, you’ll have access to the full historical index

    Usage

    Basic Search

    1. Enter one or more Twitter usernames (comma-separated)
    2. Click “Search” or press Enter
    3. View results showing historical usernames and dates

    Example Queries

    • libsoftiktok – Popular account with username history
    • elonmusk – High-profile account
    • twitter,github – Multiple accounts at once

    Understanding Results

    • Account ID: Unique Twitter account identifier
    • Screen Names: Historical usernames used by the account
    • Dates: When each username was observed
    • Current: The most recent username

    API Endpoints

    Search API

    • GET /api/search?usernames=<usernames>&platform=twitter&token=<token>
    • POST /api/search (with JSON body)

    Authentication API

    • POST /api/auth/github – Initiate GitHub device flow
    • GET /api/auth/github?device_code=<code> – Complete authentication

    Customization

    Styling

    The app uses Tailwind CSS with a custom design system. Modify src/app/globals.css for global styles.

    Components

    All UI components are built with shadcn/ui and can be customized in src/components/ui/.

    Configuration

    • Update metadata in src/app/layout.tsx
    • Modify API endpoints in src/app/api/
    • Customize authentication flow in src/components/auth-modal.tsx

    Deployment

    Vercel (Recommended)

    1. Push your code to GitHub
    2. Connect your repository to Vercel
    3. Deploy automatically

    Other Platforms

    The app can be deployed to any platform that supports Next.js:

    • Netlify
    • Railway
    • DigitalOcean App Platform
    • AWS Amplify

    Contributing

    1. Fork the repository
    2. Create a feature branch (git checkout -b feature/amazing-feature)
    3. Commit your changes (git commit -m 'Add amazing feature')
    4. Push to the branch (git push origin feature/amazing-feature)
    5. Open a Pull Request

    License

    This project is licensed under the MIT License – see the LICENSE file for details.

    Acknowledgments

    • Memory.lol: The underlying data service providing historical Twitter account information
    • Travis Brown: Creator of Memory.lol and the comprehensive dataset
    • shadcn/ui: Beautiful, accessible UI components
    • Vercel: Next.js framework and deployment platform

    Built by bankkroll.eth

    Visit original content creator repository https://github.com/BankkRoll/memoryloler
  • digtron

    Modular Tunnel Boring Machine

    aka The Almighty Digtron

    This mod contains a set of blocks that can be used to construct highly customizable and modular tunnel-boring machines, bridge-builders, road-pavers, wall-o-matics, and other such construction/destruction contraptions.

    A digging machine’s components must be connected to the control block via a path leading through the faces of the blocks – diagonal connections across edges and corners don’t count.

    The basic block types that can be assembled into a functioning digging machine are:

    • Digger heads, which excavate material in front of them when the machine is triggered
    • Builder heads, which build a user-configured node in the direction they’re facing
    • Inventory modules, which hold material produced by the digger and provide material to the builders
    • Fuel modules, which holds flammable materials to feed the beast
    • Control block, used to trigger the machine and move it in a particular direction.

    Diggers mine out blocks and shunt them into the Digtron’s inventory, or drop them on the ground if there isn’t room in the inventory to store them.

    Builder heads can be used to lay down a solid surface as the Digtron moves, useful for situations where a tunnel-borer intersects a cavern. Builder heads can be set to construct their target block “intermittently”, allowing for regularly-spaced structures to be constructed. Common uses include building support arches at regular intervals in a tunnel, adding a torch on the wall at regular intervals, laying rails with regularly-spaced powered rails interspersed, and adding stairs to vertical shafts.

    The auto-controller block is able to trigger automatically for a user-selected number of cycles. A player can ride their Digtron as it goes.

    Other specialized Digtron blocks include:

    • An “axle” block that allows an assembled Digtron to be rotated into new orientations without needing to be rebuilt block-by-block
    • A crate that can store an assembled Digtron and allow the player to transport it to a new location
    • A duplicator that can create a copy of an existing Digtron (if provided with enough spare parts)
    • An item ejector to clear Digtron’s inventory of excavated materials and inject it into pipeworks tubes if that mod is installed.
    • A light that can be mounted on a Digtron to illuminate the workspace as it moves
    • Structural components to make it look cool

    The Digtron mod depends on the default mod and fakelib, and includes optional support for several other mods:

    • doc, an in-game documentation mod. Detailed documentation for all of the Digtron’s individual blocks are included as well as pages of general concepts and design tips.
    • pipeworks, a set of pneumatic tubes that allows inventory items to be extracted from or inserted into Digtron inventories.
    • hopper, a different mod for inserting into and extracting from Digtron inventories. Note that only the most recent version of hopper is Digtron-capable, earlier versions lack a suitable API.
    • awards, a mod that adds achievements to the game. Over thirty Digtron-specific achievements are included.
    • technic, which adds rechargeable batteries and power cables to the game that Digtron can use instead of fuel.
    • TechAge, a mod that adds technology stages where the player advances from the water mill and steam engine into future technology. It includes a rechargeable Digtron Battery.

    Visit original content creator repository
    https://github.com/minetest-mods/digtron

  • radiant_damage

    radiant_damage

    This mod allows registered nodes to damage a player if the player is simply near them, rather than having to be immersed in them directly. For example, in real life simply being close to lava would burn you. Or perhaps being near a highly radioactive material would be damaging.

    This mod comes with a set of predefined radiant damage types, all of which can be enabled and disabled independently, and allows other mods to make use of its system to register their own.

    Configurable Presets

    Important note: none of these predefined radiant damage types are enabled by default. This is because one of this mod’s intended uses is as a library for other mods to use to enable their own radiant damage types. There is no way to de-register a globalstep callback (the mechanism used by this mod to deliver damage) once it has been registered, so to keep the mod maximally flexible nothing is registered by default.

    Set one or more of the following types to enabled if you want this mod to have an effect out-of-the-box.

    The following settings exist for predefined radiant damage types:

    radiant_damage_enable_heat_damage (Enable radiant heat damage) bool false
    radiant_damage_lava_damage (Damage dealt per second when standing directly adjacent to one lava node) int 8
    radiant_damage_fire_damage (Damage dealt per second when standing directly adjacent to one fire node) int 2
    
    radiant_damage_enable_mese_damage (Enable mese ore radiation damage) bool false
    radiant_damage_mese_interval (Number of seconds between mese radiation damage checks) int 5
    radiant_damage_mese_damage (Damage dealt per second when standing directly adjacent to one mese ore node) int 2
    

    Mese radiation is attenuated by a factor of 0.9 when passing through most materials, by 0.5 when passing through anything with group:stone, by 0.1 when passing through anything with group:mese_radiation_shield (all default metal blocks are given this group), and is amplified by a factor of 4 when passing through nodes with group:mese_radiation_amplifier (default coal and diamond blocks). Note that these fine-grained attenuation factors only work in Minetest 0.5 and higher, for 0.4.16 any non-air node will block all damage.

    API

    Registering a damage type

    Call:

    	radiant_damage.register_radiant_damage(damage_name, damage_def)
    

    where damage_name is a string used to identify this damage type and damage_def is a table such as:

    {
    	interval = 1, -- number of seconds between each damage check. Defaults to 1 when undefined.
    	range = 3, -- range of the damage. Can be omitted if inverse_square_falloff is true,
    		-- in that case it defaults to the range at which 0.125 points of damage is done
    		-- by the most damaging emitter node type.
    	emitted_by = {}, -- nodes that emit this damage. At least one emission node type
    		-- and damage value pair is required.
    	attenuated_by = {} -- This allows certain intervening node types to modify the damage
    		-- that radiates through it. This parameter is optional.
    		-- Note: Only works in Minetest version 0.5 and above.
    	default_attenuation = 1, -- the amount the damage is multiplied by when passing 
    		-- through any other non-air nodes. Defaults to 0 when undefined. Note that
    		-- in versions before Minetest 0.5 any value other than 1 will result in total
    		-- occlusion (ie, any non-air node will block all damage)
    	inverse_square_falloff = true, -- if true, damage falls off with the inverse square
    		-- of the distance. If false, damage is constant within the range. Defaults to
    		-- true when undefined.
    	above_only = false, -- if true, damage only propagates directly upward. Useful for
    		-- when you want to damage players only when they stand on the node.
    		-- Defaults to false when undefined.
    	on_damage = function(player_object, damage_value, pos), -- An optional callback to allow mods
    		-- to do custom behaviour. If this is set to non-nil then the default damage will
    		-- *not* be done to the player, it's up to the callback to handle that. If it's left
    		-- undefined then damage_value is dealt to the player.
    }
    

    emitted_by has the following format:

    	{["default:stone_with_mese"] = 2, ["default:mese"] = 9}
    

    where the value associated with each entry is the amount of damage dealt. Groups are permitted. Note that negative damage represents “healing” radiation.

    attenuated_by has the following similar format:

    	{["group:stone"] = 0.25, ["default:steelblock"] = 0}
    

    where the value is a multiplier that is applied to the damage passing through it. Groups are permitted. Note that you can use values greater than one to make a node type magnify damage instead of attenuating it.

    Updating/overriding a registered damage type

    To modify or add new parameters to an existing already-registered damage type use the following function:

    	radiant_damage.override_radiant_damage(damage_name, damage_def)
    

    Where damage_def is a table as above but which only includes the new information. For example, a mod could add a new type of mese radiation emitter with the following:

    	radiant_damage.override_radiant_damage("mese", {
    		emitted_by = {
    			["dfcaverns:glow_mese"] = radiant_damage.config.mese_damage * 12,
    		},
    	})
    

    To remove an emission source set its emitted damage to 0.

    To remove an attenuation node type, set its attenuation factor to equal the default attenuation factor.

    If you wish to “disable” a registered damage type, use this override function to set its range to 1 and its interval to an enormous value (millions of seconds) to neutralize the damage type’s global callback most efficiently.

    Further reading

    These wiki pages may be of interest regarding the principles behind some of this mods’ functions:

    Visit original content creator repository
    https://github.com/minetest-mods/radiant_damage

  • scheduler

    merge scheduled PR

    agba-merger

    A GitHub bot that helps you publish any feature in your project or article in your developer blog, on a scheduled date/day

    agba merger

    Usage

    To use this bot, you’ll have to install it from GitHub’s Marketplace. Make sure you give it access to the scopes it is requesting for.

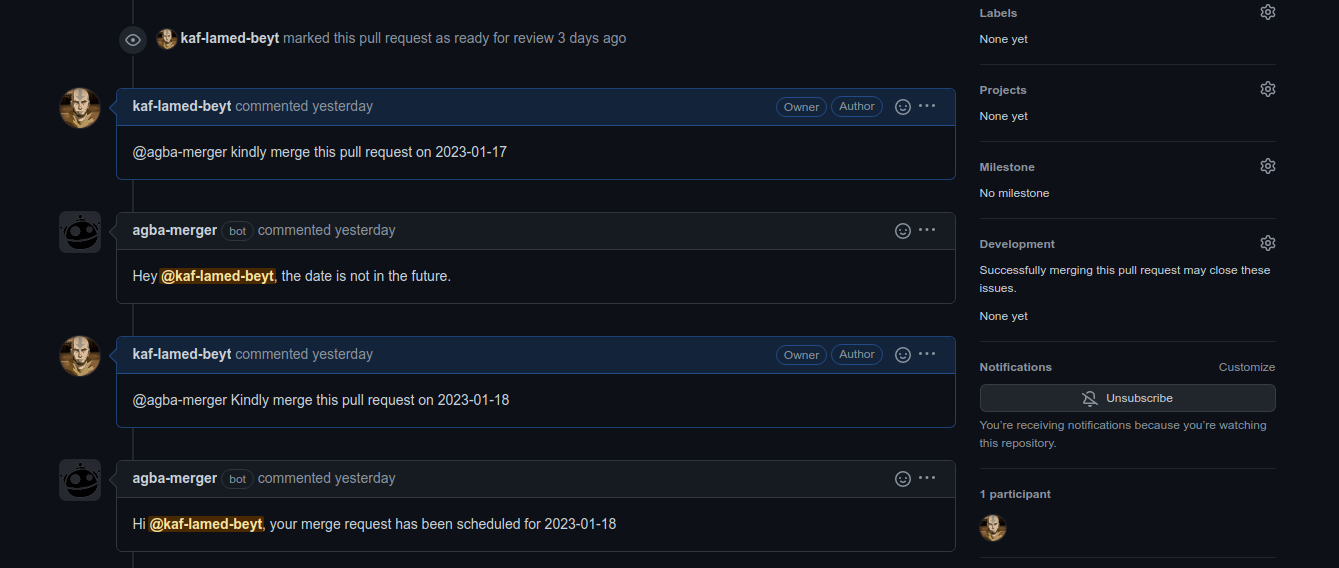
    When you have a pull request that you want to schedule with the help of the bot, simply call its attention to that PR by typing the following in the PR’s comment:

    "Yo! **@agba-merger**, please **merge** this pull request on **2023-01-22**"

    You can choose to construct this sentence in any manner that seems appropriate to you. The keywords you shouldn’t leave out are the name of the bot @agba-merger, the merge, and your date in “YYYY-MM-DD format.

    ⚠️ the bot isn’t completely stable yet. So when you schedule a merge request and you find out that the pull request was not merged, that’s on me kindly give me time to provide a fix.

    Nevertheless, if you think you have straightforward approach to fix this, please feel free to submit a PR.

    Setup

    # Install dependencies
    npm install
    
    # Run the bot
    npm start

    Docker

    # 1. Build container
    docker build -t agba-merger .
    
    # 2. Start container
    docker run -e APP_ID=<app-id> -e PRIVATE_KEY=<pem-value> agba-merger

    Contributing

    If you have suggestions for how agba-merger could be improved, or want to report a bug, open an issue! We’d love all and any contributions.

    For more, check out the Contributing Guide.

    License

    MIT © 2023 kaf-lamed-beyt

    Visit original content creator repository https://github.com/kaf-lamed-beyt/scheduler
  • ReNew-Power-Hackathon-Predicting-Rotor-bearing-temperature

    Renew Power Hiring Hackathon – Rotor bearing temperature Prediction

    ReNew Power is one of the largest renewable energy Independent Power Producers in India and globally. ReNew Power develops, builds, owns, and operates utility-scale wind and solar energy projects, and hydro projects. As of June 14, 2022, ReNew Power had a gross total portfolio of ~12.8 GW of renewable energy projects across India.

    Problem Statement :
    Unplanned downtime of wind turbines can result in a significant loss of revenue and energy and can easily scale to millions of dollars a year. It is therefore pivotal that flagging of the failure of components is made to prevent further loss and perform maintenance. It, however, involves replacement of components and higher costs. Condition-based monitoring systems rely on supervisory control and data acquisition systems to predict faults and get valuable insights into the turbine’s performance.

    ReNew Power shared minute-wise normalised data of wind speed, power and temperature data for multiple components of a wind turbine. The company is looking to create a model to get an ideally functioning turbine’s expected rotor bearing temperature. It will then use the model to check the deviation of the actual rotor bearing temperature of the faulty turbine from the expected temperature.

    Evaluation :
    The submission is evaluated using the Mean Absolute Percentage Error.

    Data
    https://machinehack.com/hackathons/renew_power_hiring_hackathon/data

    NOTE: “Timestamp is the unique identifier of the data; it shouldn’t be used as an input in the model”

    After applying various algorithms like Linear Regression, Lasso, Ridge, Random Forest and Xgboost and Xgboost gave the best performance and my MAPE score comes out to be 0.01925

    Visit original content creator repository
    https://github.com/Isaacjohn55/ReNew-Power-Hackathon-Predicting-Rotor-bearing-temperature

  • ProtectedMemory-Delphi

    Protected Memory for Delphi

    Safeguarding sensitive data from hackers or processes debuggers by protecting memory regions from access and ensuring data is cleared when no longer needed.

    Memory protection for Delphi

    Why you need it!?

    It’s crucial to protect sensitive information, such as encryption keys, passwords, and other confidential data, from unauthorized access. Without proper memory protection, even temporarily stored sensitive data in memory can be vulnerable to attacks like memory dumps or process injection. This unit helps to lock and protect memory, ensuring that sensitive data is shielded and securely erased when no longer needed.

    Usage

    1. Clone or simply download the unit: Clone the repository or download the ProtectedMemory unit to your Delphi project.
    2. Start using it: Use the ProtectMemory, UnProtectMemory, and ReleaseProtectedMemory procedures to secure your memory.
    3. Release the Memory: Ensure that memory is released and cleared after use by calling ReleaseAllProtectedMemory.
    4. Please give it a 🌟 and share it with others

    What’s New

    1. Added TProtectedStream class

    • A new TProtectedStream class was added, inheriting from TMemoryStream.
    • It uses VirtualAlloc for memory allocation and VirtualProtect to protect and unprotect the memory.
    • The IsProtected property lets you toggle between protected (no access) and unprotected (read/write) states.

    Examples

    Example: protect constant data

    uses
      ProtectedMemory;
    
    var
      Data: array[0..255] of Byte;
      DataPtr: Pointer;
    begin
      Data[0] := 99;
      Data[1] := 11;
      Data[2] := 22;
      Data[3] := 33;
      Data[4] := 44;
      Data[5] := 55;
      DataPtr := @Data[0];
      
      // Protect the memory (prevents access to the memory region)
      ProtectMemory(DataPtr, SizeOf(Data));
    
      // Accessing the protected memory here will return zeros.
      // Unprotect the memory before accessing it
      UnProtectMemory(DataPtr);
    
      // Optionally release the memory and clear its content
      ReleaseProtectedMemory(DataPtr);
    end;

    Example: protect delphi managed string

    uses
      ProtectedMemory;
    
    var
      SensitiveStr: string;
      NonSensitiveStr: string;
      DataPtr: Pointer;
    begin
      SensitiveStr := 'Sensitive Data';
      NonSensitiveStr := 'Not Sensitive Data';
    
      // Get a pointer to SensitiveStr's memory
      DataPtr := Pointer(SensitiveStr);
    
      // Protect the memory region containing SensitiveStr
      Writeln('Protecting memory...');
      ProtectMemory(DataPtr, Length(SensitiveStr) * SizeOf(Char));
    
      // Accessing SensitiveStr here will return zeros or show undefined behavior
      Writeln('SensitiveStr after protection: ', SensitiveStr);
    
      // You can still access NonSensitiveStr, which is unaffected
      NonSensitiveStr := 'Updated Non-Sensitive Data';
      Writeln('NonSensitiveStr: ', NonSensitiveStr);
    
      // UnProtect Memory it's reutrn it's orginal data
      Writeln('Releasing memory...');
      UnProtectMemory(DataPtr);
    
      // SensitiveStr is now restored
      Writeln('Restored SensitiveStr: ', SensitiveStr);
    end;

    Example: TProtectedStream Usage

    uses
      ProtectedStream;
    
    var
      Stream: TProtectedStream;
      Data: AnsiString;
      Buffer: array[0..255] of Byte;
    begin
      Data := 'Sensitive Data';
      
      Stream := TProtectedStream.Create;
      try
        Stream.Write(PAnsiChar(Data)^, Length(Data));
        Data := '';
        Stream.IsProtected := True;  // Protect the memory
    
        // Unprotect to read
        Stream.IsProtected := False;
        Stream.Read(Buffer, 10);
      finally
        Stream.Free;
      end;
    end;

    Procedures

    • ProtectMemory(var DataPtr: Pointer; Size: NativeUInt): Protects the specified memory region by setting it to PAGE_NOACCESS and locking it to prevent paging. The data is copied to a new protected memory block, and the original pointer is updated to point to this protected block.

    • UnProtectMemory(DataPtr: Pointer): Restores the memory protection to PAGE_READWRITE and removes the region from the list of protected memory blocks.

    • ReleaseProtectedMemory(DataPtr: Pointer): Restores memory access, clears the content by securely zeroing the memory, and removes it from the protected list.

    • ReleaseAllProtectedMemory(): Releases and clears all protected memory regions.

    Author

    • Shadi Ajam

      GitHub LinkedIn

    Useful Unit, Right?

    YES! We’d love your support! Please give it a 🌟 and share it with others.

    Share on social media:

    Share on LinkedIn Share on Dev.to Share on X Share on Reddit Share on Facebook
    Visit original content creator repository https://github.com/shadiajam/ProtectedMemory-Delphi
  • robservable

    CRAN status CRAN Downloads Lifecycle: maturing R build status

    robservable

    This package allows the use of Observable notebooks (or parts of them) as htmlwidgets in R.

    Note that it is not an iframe embedding a whole notebook — cells are <div> included directly in your document or application. You can choose what cells to display, update cell values from R, and add observers to cells to get their values back into a Shiny application.

    The following GIF shows a quick example of reusing a bar chart race notebook inside R with our own data.

    example

    You’ll find more examples and the associated R code in the robservable gallery.

    Features

    • Display an entire published or shared notebook as an htmlwidget
    • Display specific cells of a published or shared notebook as an htmlwidget
    • Use R data to update cell values
    • Add observers on cell values to communicate with a Shiny app
    • Use inside Shiny app, Rmarkdown or Quarto document (as any htmlwidget)

    Limitations

    Warning: in Quarto documents, you must either use robservable or ojs cells. Using both in the same document will make at least one of both fail.

    • Named cells can be included by name, but unnamed cells are refenced by their index (1-based), which is sometimes a bit tricky to determine. An alternative is to fork the notebook and name the cell in Observable.
    • No offline support : the included notebooks have to be downloaded each time they are used.

    Installation

    The package is on CRAN, but you can also install the development version with:

    remotes::install_github("juba/robservable")

    Usage

    For an introduction and examples, see the introduction to robservable vignette.

    For a small gallery of interesting notebooks, see the robservable gallery vignette.

    For usage in Shiny, see the robservable in Shiny applications vignette (work in progress).

    Development notes

    This package uses packer to manage JavaScript source code and dependencies. If you want to modify it, you’ll need a working installation of Node.js.

    After cloning this repository, run the following in a terminal at the project root :

    npm install

    Then, if you modify the JavaScript code in srcjs, you’ll have to run the following command to bundle and update the widget JavaScript code :

    packer::bundle_dev()

    If you want to ship a minimized production version, use :

    packer::bundle_prod()
    Visit original content creator repository https://github.com/juba/robservable